Vanity Pages
Building Your Vanity Page
In this brief tutorial you will learn how to create, edit and publish your own vanity pages on the server space provided by your ISP. This quick overview will help you build you own web presence on the Internet and allow you to share yourself with the world. Although the knowledge you gain in the next few minutes will be simple and general, it will give you a better understanding of how the World Wide Web shares it's users information.
First, here is a quick overview of what to expect on this page.
So let us begin and find out what all the hype is about in WWW land, also known as the Internet.
A vanity page is a web page created for a person or business and published on the Internet, giving access to anyone connected to the Internet to view that information. It's like the front door to your home or the edifice of a building. Just like a home or office has a street address providing access to friends and neighbors, so does too a vanity page but instead of 123 Main St., Louisville, KY. a vanity page address, or URL, may look like this: http://www.winterlong.com/sammies/laika/home.html. So when you publish a vanity page, it's like you've built a virtual home on the web and you can give your friends and family an address for them to visit when they're on the Internet highway.
With the speed of advancement of technology these days, the real question should be "What can't I put on a web page?" Well, you can't put a cow on your web page but you can put a picture of ol' Bessie next to her favorite salt lick. Publishing a web page is much like publishing a book, pamphlet, painting, movie or record, only so much easier. In fact, you could publish all of the above and present it to the world on one page, without a publisher! Do remember that you are publishing so make sure you use your own material or you may be infringing on someone else's copyrights.
Web pages can contain text, images, files, programs, music, games, movies and virtually anything you could hear, see or do with a computer. Moreover, text can move and change size and color, images can move and become interactive, files can be downloaded, programs can be run, music can be heard, games can be played, movies can be viewed and replayed, well, you get the idea.
So let's begin to see how all these wonderful things can be placed on your vanity page.
Text, images, sounds, etc. are placed onto a web page using a simple markup language called HTML (Hypertext Markup Language). Don't let this scare you away because it's sounds like you'll have to learn some kind of machine code that takes years of college to learn, instead think of it as simple instructions that tell your web browser how to present all of the information to you and what it should look like. Your web browser, weather it be Internet Explorer, Netscape or something else, will take care of all the machine code for you.
Many folks like to use HTML Editors instead of trying to learn HTML which is an excellent idea as editors will save you time and money but it's a really good idea to get the basics of HTML so when your editor messes up your code, you may be able to fix it manually.
In the next paragraph, we'll make a simple web page and it will shine some light on all this sleepy computer stuff.
HTML <href="http://www.jokes.com"> Looks funny, doesn't it?
When you create a document in Microsoft Word or any other word processing program, the fonts, paragraphs, indents, margins and other formatting properties are written into the document using a markup language much like HTML but you don't see them because it's the job of the word program to interpret those commands and show you the text as it was written. The web browser does the same thing with HTML commands and puts the words and pictures where they belong.
Let's make a quick web page and see what it looks like!
Open up notepad (Start/Programs/Accesories/Notepad.exe) or a simple text editor. When it's open type or copy and paste this:
| <html> <head> </head> <body> <H2>Welcome to my home page</H2> </body> </html> |
Now select "File" then "Save as" and save the file on your desktop as "Welcome.htm." View your desktop and double click on "Welcome.htm" and your web browser will now show you a web page that should look like this - Welcome.htm
While the web page is open, right click on it or click "view" on your toolbar and choose "view source" or "source" and your browser will show you a text file that looks exactly like the one you created earlier.
HTML uses "tags" to tell the browser what to do with the words, images, files, etc. A tag looks like this: <html> and all tags are followed by a closing tag like this: </html> The tags tell the browser what to do with the information between the opening (<head>) and closing (</head>) tags. Each tag has a specific duty.
| <html></html> | This tells the browser that this document is written in HTML |
| <head></head> | This tells the browser that this section is the header of the document. Here you would insert the name of the page and <Meta> tags that help search engines find your page. |
|
<body></body> |
This tells the browser all the things that are going to be viewed. Here is where the body of your document lies and most of anything viewed will be here. |
| <H1></H1> <H2></H2> <H3></H3> <H4></H4> <H5></H5> <H6></H6> |
This tells the browser that the following text is a heading and the number pertains to size. 1 is largest, 6 is smallest. |
| <HR> | This will add a horizontal rule to your page. This tag does not need a closing tag. Go ahead and add it to the web page you created. First, rename your Welcome page to Welcome.txt, add the <HR> tag and save it as Welcome.htm. Your page should look like this. |
| <title></title> | Put this tag between the <head> and </head> tags, add some words between the <title> and </title> tags and view your page again to find it has a title in the very top bar of your browser like this. |
I think by now HTML has started to show a bit of a pattern so I need not go on but I will briefly show you how to insert text, images and links. After that I will give you some references to pages dealing with a little more HTML in depth, particularly lists of HTML tags so you can experiment.
Place text between the <H1> and </H1> tags, remember you have H1 - H6 for size, and place the tags and text between the <body> and </body> tags. Check out some of these resources for other tags to help you change the font, size, style and other attributes and to help you learn more about HTML.
| HTML Guide |
| HTML Courses |
| HTML Goodies |
| Page Tutor |
| The easiest HTML guide for beginners |
The links above will also help you learn more about HTML and the endless possibilities that will lead you to the design of your web page.
Most images come in the format of jpeg, gif, bmp, etc. and there is much to learn about them and the proper ways of dealing with them on your web page. You can learn much from the links above on this subject but for now, I will show you how to insert a small image on your page in a few quick, basic steps. First, you will need to save the image to the same folder that your web page is located. Make a folder on your desktop and call it "Welcome." Place your "Welcome.htm" document that you created earlier into this new folder and then copy an image to the same folder. You can use this image by right clicking on the image and choosing "save as."
![]()
To insert it into your document, rename your "Welcome.htm" to "Welcome.txt" and double click on it to open up the text file. Insert this line anywhere between the <body> tags:
<p><img src="logo.gif"></p>
If you used a different image, use the name of the image where this line reads "logo.gif." The <p></p> tags signify a new paragraph. Your whole text file should read like this:
|
<html> |
This text file is known as your Source Code. Save this file back into the "Welcome" folder as "Welcome.htm." Double click on the file and it should look like this.
The links above can help you with any other attributes you may want to add to your images.
A link in a document is much like a door to another room in your home on the Internet. When a person clicks on a link in your page, it can take them to another place on the web or even link to an area in the same document. There are two things to consider when you are creating a link. The first thing is to know what text or image you want your reader to click on and then you need to know where that link will take them. So let's create a link on our Welcome page.
First, rename the "Welcome.htm" to "Welcome.txt" and double click on it to open it up in notepad. Add this line under the last line we created:
<p><a href="http://www.tucows.com">This is a link</a></p>
I've color-coded the line so I can show you what each area means.
Your source code should now look like this:
|
<html> |
Your web page should look like this.
Notice the differences between your source code and the following source code and see if you can guess what I have just done with the code.
| <html> <head> </head> <body> <H2>Welcome to my home page</H2> <HR> <p><a href="http://www.tucows.com"><img src="logo.gif"></a></p> <p><a href="http://www.tucows.com">This is a link</a></p> </body> </html> |
You guessed it. I've made a link out of the image of the cows. Now when I rename this text to "Welcome.htm", I can open it in my browser and when I click on the picture, it will take me to the Tucows.com web site where I can get plenty of freeware and shareware software.
This is all very basic and very simple HTML but at least you have some idea of how to create a web page and how HTML code works. From here, it actually gets easier because I'm going to introduce you to the world of HTML editors so let's move ahead and see what the World Wide Web can help us experience.
Vanity Pages
Getting Fancy
HTML Editors
Thanks to the information age, we can travel from this page to another page, download an HTML editor and return with a new tool to help us save time and energy. It's like running down to the local hardware store to pick up a circular saw so we can build our house. These days even our word processing programs like Microsoft's™ Word can create HTML. Simply click on File/Save As and save it as a web page. Unfortunately, the code it creates doesn't always work as you expect.
If you enjoy learning the HTML language and are interested in learning much more, there are plenty of freeware HTML editors out there on the Internet at freeware sites such as Tucows.com or CNET.com.
If you're more interested in getting a fancy web page up and running quickly you can go to your local computer store and purchase Microsoft's™ FrontPage or Macromedia's™ Dreamweaver. There are plenty of other great editors out there, too.
Editors are a great way to save precious time on the creation of your web page but it takes time to learn how to use the editor just like it took time to learn your word processor program. Editors are also sometimes limited but if you know a little bit about the code your editor is creating, you can get around those difficult times.
Web pages can contain so many wonderful sights and sounds and can even be interactive to the viewer to provide much entertainment. The idea behind that is to get as many people to come visit your page as possible and keep them coming back as you offer them more and updated information. You may ask, "Why would someone do all that for free?" Because web pages are publications, there is space on those web pages for brief advertisements much like a newspaper or magazine. The more people that visit your web page, the greater the chance of them viewing those advertisements and therefore, the greater the value of space on your web page.
Some of the great interactivity of web pages relies on embedded programs such as Java, Visual Basic programs, Flash and Shockwave media. New technologies are being integrated every day into the old HTML documents so you can see how important it is to understand. In the next few paragraphs I will briefly go through some of these new technologies and point you to some sites that can shed greater light on them.
DHTML
Dynamic Hyper Text Markup Language, or DHTML, is a mixture of HTML, JavaScript and various other languages that allow for more dynamic and interactive web pages. DHTML is great for making words and sentences fly around the browser window or create simple drop down boxes without having to learn a whole lot of programming. Unfortunately not all browsers support the same language usage so a web page made for Internet Explorer may not work the same when viewed with Netscape. You can learn a lot about this technology by checking out these web pages.
Experience DHTML
DHTML....What
is it?
DHTML School
JAVA
Java is an object oriented programming language that takes quite a bit of extensive knowledge and patients to learn. If you like programming, Java is a fun language to learn. Many web pages embed Java programs like applets and classes into the page to make them more dynamic and user interactive. Below are some links to some web sites with Java in them and some sites about learning it.
The Source for Java(™) Technology
The Java Boutique
JavaApplets.com
Flash and Shockwave
Macromedia has provided the world a way to incorporate rich-media content and wonderful interactivity into it's web sites and it would take quite a bit of time to explain it so I'll direct you to a site where you can view it. Flashpreviews.com has a perfect example of a purely Macromedia based start page. Although Flash and Shockwave players are available free on the Internet, the tools used to create the content are quite expensive. If you want to learn more about Flash and Shockwave visit Macromedia, today.
So now that you have created your vanity page or home page you need to present it to the world. Since no one on the Internet can see your web page when it's sitting on your computer, you will have to upload or post the pages that you have created to a server that is always on and connected to the Internet. Your Internet Service Provider (ISP) just happens to have one of those computers for just that purpose and most ISPs offer anywhere from 5 megabytes to 100 megabytes of web space for you to use as you please. Ask your ISP for the FTP address that you will use to upload your pages. You'll need it for the next step.
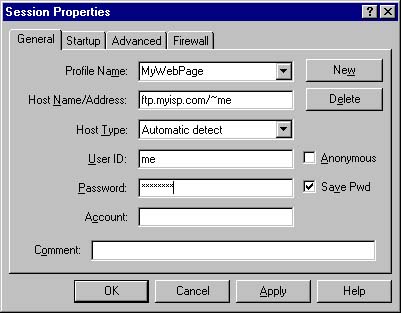
Go to Tucows.com and look for a free FTP program called WS_FTP LE or CUTE_FTP or just download this one. WS_FTP LE Open WS_FTP after you have installed it and create a connection, supplying the information from your ISP. Your host or address may be something like ftp.yourisp.net/~yourname or 123.45.67.8/~yourname or whatever your ISP told you. You can use automatic detect for connection type or use whatever your ISP told you. Your user name and password should be the same one you use for email unless your ISP told you otherwise.
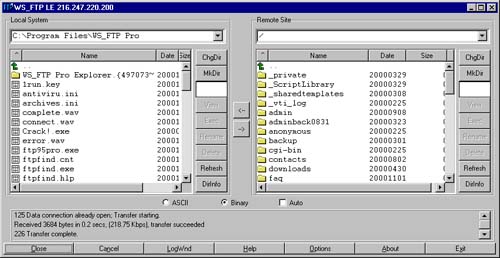
On the left side will be a list of files, folders and drives that are the folders on your hard drive, also known as your local files. On the right will be the folder where you will post your web pages. This is known as the remote site.
Before uploading your web page, rename the page that you want everyone to see first to index.htm or index.html. When someone types in the URL to your web address, the first page your ISP's server will present to him or her is the index.htm or index.html file. After that you can name the pages whatever you want as long as the links to those pages reflect the same name as the page.
That's about all there is to it so I'll end this tutorial here at let you work on a more creative home page. Good luck and remember, when you get stuck, there are plenty of resources on the Internet to help you out and it's all free!
So you've posted you web page. Great! Tell all your friends and family about it and give them the URL to your page so they can visit you on the Internet! If you don't know what your URL is, ask your ISP or it may be just like your WS_FTP connection except, replace the "ftp" with "http://www."
If your FTP connection was "ftp.yourisp.net/~yourusername then your URL might be "http://www.yourisp.net/~yourusername"
Hopefully this tutorial has helped you understand the basic fundamentals of creating your vanity page and shed some light on this wonderful thing called the World Wide Web.